

iMovie is very selective about video files: it accepts MP4 and MOV and politely declines files in MKV format. This becomes a real problem if you receive a downloaded movie or OBS recording as a file type Matroska. Good news is there is a simple workaround that is free and preserves quality. Here’s how you can upload MKV to iMovie and not lose any video quality.
The refusal does not relate to quality. MKV is just a container that can hold nearly any codec and video and audio; iMovie only reads a very short list of codecs and containers. Sometimes video inside MKV files is fine H.264 and so file can be repacked rather than re-encoded which takes seconds.
Why iMovie Refuses MKV Files
- Container mismatch – iMovie reads MP4 and MOV container types but MKV (Matroska) is not included in its supported list regardless of how good video quality is.
- Codec allowlist– iMovie works with H.264 and HEVC video and AAC audio but other uncommon codecs continue to fail.
- One exception you can skip – renaming .mkv to .mp4 for some files works sometimes, when this fails video playback silently breaks and you should use actual conversion directly.
The practical consequences: OBS recordings (the app itself recommends MKV for crash-safe recording), downloaded movies and Blu-ray rips all arrive as MKV – and all three need one of the three fixes below.
How to Upload MKV Videos to iMovie with 3 Methods
Regardless of which method you use, you end up with a clean MP4 that iMovie accepts without issues: Use VLC if you want no setup involved, use FFmpeg if you want conversion to be quick, and HandBrake if you want proper reencoding of codecs inside MKV.
Method 1: Convert MKV to MP4 with VLC (Easiest)
The zero learning option uses VLC Player, which most people already have. The program re-packs MKV into MOV or MP4 containers and preserves both the original video and audio tracks. This is a remux rather than a conversion, so the quality of the file stays exactly the same as the source.
- Open the MKV file in VLC Media Player and pause it.
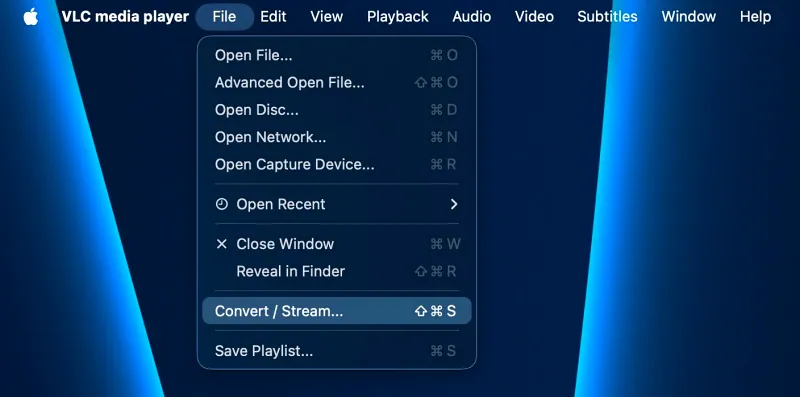
- Open File → Convert / Stream (Mac: File → Convert & Stream by default).
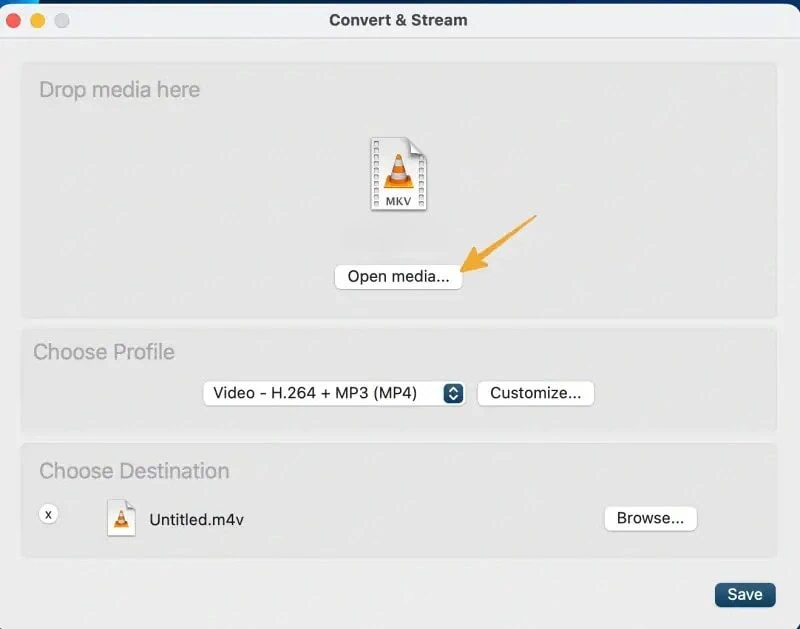
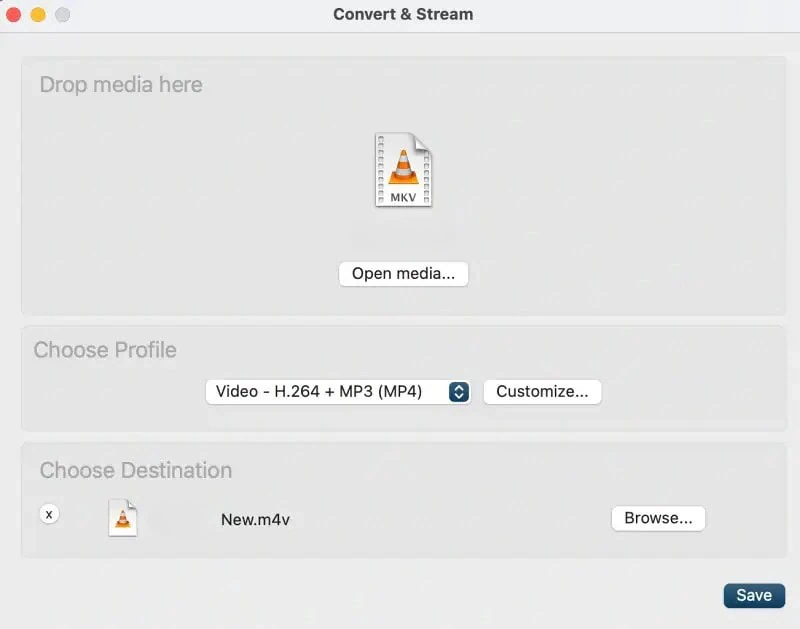
- Click Open Media, load the MKV, then hit Customize next to the profile picker.
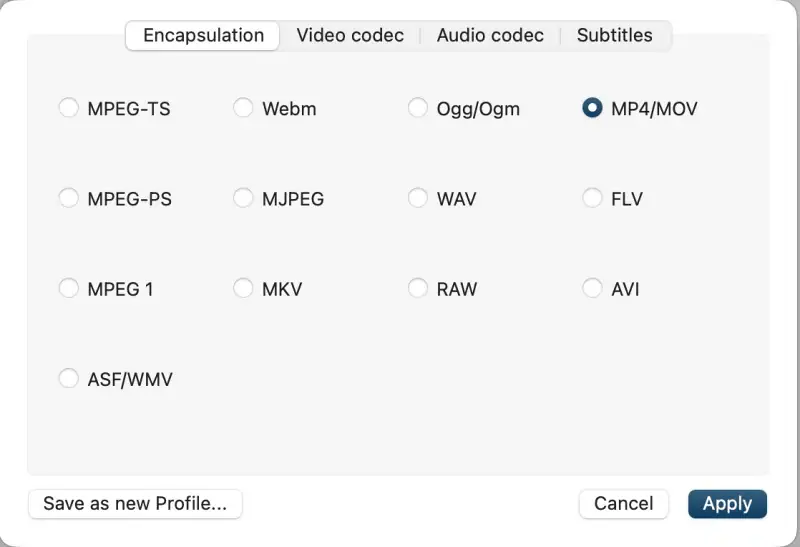
- Under Encapsulation, choose MP4/MOV.
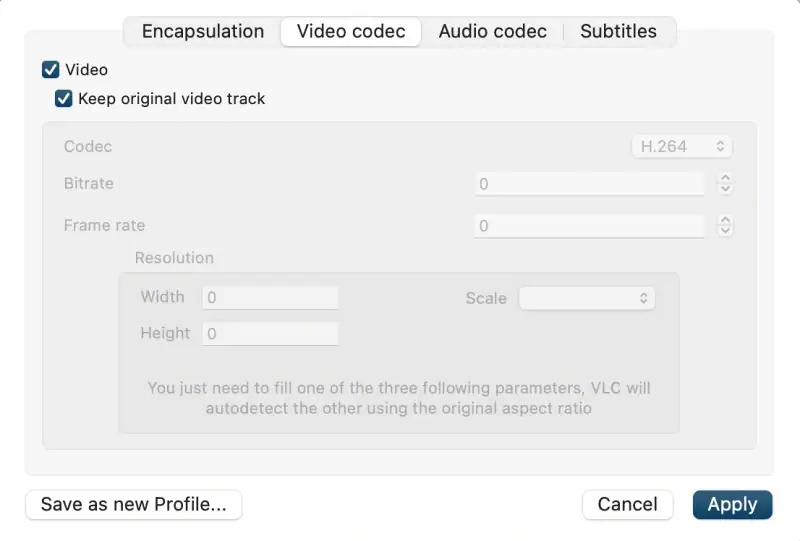
- Under Video Codec, tick Keep Original Video Track.
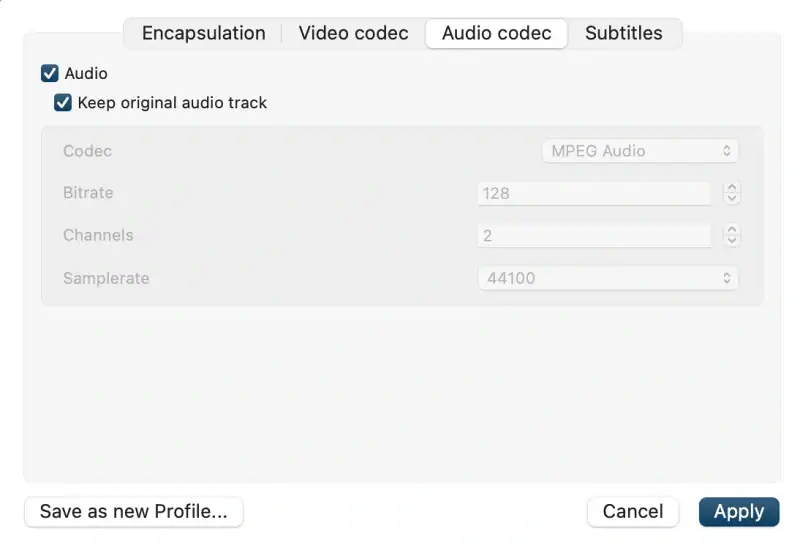
- Under Audio Codec, tick Keep Original Audio Track and apply.
- Pick a destination and filename, click Save, and VLC writes an .m4v file.
Keeping the original tracks means no video quality is lost. If the audio track inside the MKV is AC3 or DTS, iMovie may show the video but play silence – in that case, re-encode the audio to AAC (see troubleshooting).
Method 2: Use FFmpeg to Upload MKV to iMovie (Fastest, Lossless)
The fastest route to upload MKV to iMovie is Terminal: one single command will convert MKV files to MP4 very quickly and a second command re-encodes any files with less common codecs. Use Terminal and ffmpeg are top picks for people converting losslessly from one video format type to another.
- Install FFmpeg on the Mac:
brew install ffmpeg(Homebrew required;brew install --cask homebrew/cask/ffmpegalso works). - Open Terminal and run:
ffmpeg -i video.mkv -c copy video.mp4 - If the command finishes in seconds, the inner codecs were already iMovie-friendly and the video is now an MP4 with zero re-encoding.
- If it errors with something like “codec not supported”, re-encode instead:
ffmpeg -i video.mkv -c:v libx264 -preset medium -crf 18 -c:a aac -movflags +faststart video.mp4
The -c copy variant is a pure repack. The fallback encodes H.264 + AAC, which is exactly the combination iMovie loves; CRF 18 keeps quality high at a reasonable size.
Method 3: Re-encode with HandBrake (GUI, Reliable)
Handbrake is a favorite among conversion tools because of its graphical interface. It always reencodes so it handles every combination of codecs and its presets for macOS apps are fine tuned. When you need to upload MKV to iMovie and the codecs do not match, this is the tool that handles them.
- Download HandBrake from the official site and open the MKV.
- Pick the Fast 1080p30 preset, or Apple TV 1080p30 / Apple TV 2160p60 for 4K material.
- Set the container to MP4 (File → Preferences → Output Files) and the audio codec to AAC.
- Encode, then drag the result into iMovie.
Those Apple TV presets are the ones Blu-ray rippers on the forums consistently feed into Final Cut and iMovie without problems – H.264 video inside an MP4 with AAC audio. Whichever route you pick, uploading MKV to iMovie stops being a wall and becomes a ten-minute job.
Import the File into iMovie
- Open iMovie and create a new movie project.
- Either File → Import Media and select the converted file, or drag it straight from Finder into the project browser.
- Let the clip finish processing before editing it.
- Drop it on the timeline and cut away – the footage behaves exactly like a natively recorded clip.
Troubleshooting
- Video imports but no sound – the MKV carried AC3 or DTS audio. Re-run the conversion with the audio track forced to AAC:
-c:a aac -b:a 192k. - Black screen after import – a 10-bit HEVC or VP9 source. Re-encode to H.264:
-c:v libx264 -pix_fmt yuv420p. - Huge output file – CRF 18 is high quality; CRF 23 is a good balance for long recordings.
- Subtitles disappear – soft subtitles inside MKV do not carry to MP4 automatically; burn them in with
-c:s mov_textor add them in iMovie instead. - Stutter on the timeline – high-bitrate 4K can be slow to scrub; use a proxy clip or the Apple TV 2160p60 preset.